
Table of Contents
Learn how to Clean Motherboard (Correctly + Deep Cleaning Tips)
If your computer has become very sloppy and sluggish over time, maybe the partially outdated technology is not to be blamed. A lot of people, without doing much research, get new components for their PC.
The actual problem, however, could’ve been a clogged motherboard. Being an instrumental part of the computer, if the motherboard is not clean, the performance of your PC will be heavily affected.
Therefore, you need to be able to identify the need for cleaning your motherboard, and henceforth, you must as well know the right process to be able to clean it. In this guide, we’ll ensure you are able to cleanse your motherboard well without damaging either itself or other components of the device.
Also read:
Best Motherboard for Ryzen 7 3700x
Best B450 Motherboard for AMD Ryzen
Shutting Down and Disassembly
The first step you must take is shutting your computer down. Take out all wires, and unplug any accessories that you had attached to your device. Next, you should disassemble your PC.
For someone who’s into computers and has a custom-built PC, would know how to do this task effectively.
But in case you’ve got a standardized PC and are unable to get started. We would suggest watching a few tutorials over the internet first, and if the need arises, taking your system to the nearest tech store.
Make sure you do not lose any screws or other parts while disassembling them; they may look unimportant and insignificant. But don’t blame us when hell breaks loose inside the system later on. Using the right tools is also important, so do consider getting a new tool kit before delving into your PC.
The Right Methods and Tools
Now if you’re thinking cleaning the motherboard is not too delicate of a task, and can be done easily with the help of clothes and pressure air, please back up!
Motherboard, apart from being a highly functional part of the system, also is a very fragile part that could stop working if you do not deal with it gently.
The right way to clean off your motherboard is using compressed air and isopropyl alcohol.
Both these materials are neither rare, not very expensive, and can be accessed easily from your nearest stores, and online.
Cleaning the Motherboard
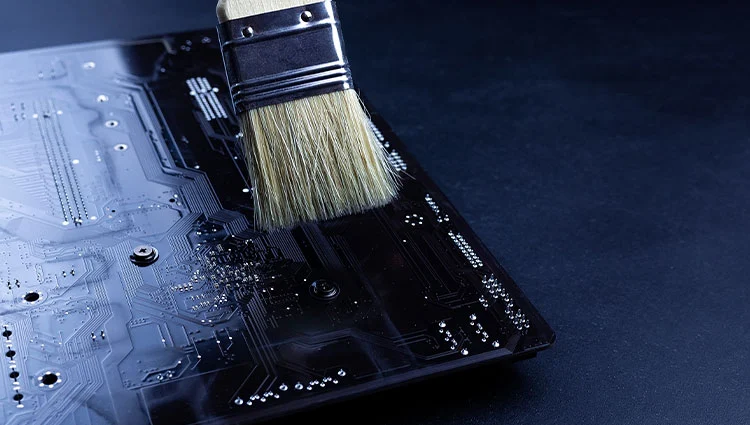
Once you’ve exposed the motherboard, you should first use compressed air to remove any dust or dirt. One thing that you should make sure of throughout the process is that you do everything gently and do not force it on the motherboard; even the slightest pressure would damage the board.
Cleaning the corners and the top is very important, as this acts as the major hindrance between the optimum performance of your board.
It is also important that you perform this cleaning in a well-lit environment so that you can see clearly what you’re doing.
The internals of a computer is very complicated and making the smallest mistake could cost you your whole system.
So, make sure the room you’re performing this task is well lit.
The next part is to apply the alcohol. Now, you might’ve seen professionals apply the alcohol with certain instruments such as tweezers, anti-static brushes, and mini spatulas, but you wouldn’t need all of this.
What you can use, alternatively are cotton buds. Dip these buds into the alcohol and gently start cleaning the motherboard. It is better to start in the middle and then move sideways, this way the whole board will be cleaned effectively.
This helps further cleaning of the motherboard since a lot of dust sticks to it over time and cannot be removed through the air. Keep cleaning the board with alcohol until it looks cleaner.
Also read:
Best Motherboards for Ryzen 5 3600
Best Motherboard for i7 9700k Intel CPU
Assembling & Re-Starting
Make sure the alcohol dries before you start assembling the PC back up. The same guidelines should be followed in the assembly as the ones that were used while opening it up. Make sure you screw all components up nicely and tightly, so there’s no sound of loose parts banging against each other when the PC runs.
After assembling it up, it’s time you reconnect the power switch and get going. Do check thoroughly to make sure there’s no disruption in the performance before you set things up as they were initially.
Additional Tips & Tricks
After going through the steps, you might feel doing this task is simply a piece of cake, but we tell you what; it sounds easier than it is.
Dealing with small parts is always a very risky task and requires a lot of concentration. Make sure you give full attention to the process while doing it. This includes disassembly, cleaning, and assembly.
Moreover, you mustn’t rush. Trying to get things done quickly, particularly if you’re doing the whole procedure for the very first time, will lead to nothing but sheer havoc.
As mentioned before, even the slightest mistake you make during the process can cost you a lot of bucks, so we suggest scheduling a few hours for the task.
Before you begin, it is recommended to check with the producer once, especially if the PC is in warranty.
Disassembling and messing with the internals of the system can make your warranty void and can lead to more tensions later on. So, gathering some beforehand data will be quite beneficial.
Watching a couple of videos on the internet people doing the whole process can also contribute towards its success. Adding on, if you get stuck at some point or believe you’ve messed up the process, do not continue. Instead, take the system to your nearest tech store or computer repair shops and consult a certified technician.
As mentioned before, the room or place where you’re carrying out the whole procedure needs to be supportive too. Well-lit and free from dust and dirt are just two things to be kept in mind. Getting a pair of gloves and a proper screwdriver kit will also prove to be quite helpful in the whole procedure.